
|
How to Make a Bootable USB Recovery Disk (Mac OS X 10.7+)
Ever wondered what to do if your Mac's hard drive becomes corrupt or wiped, or if you just want to reinstall Mac OS X? In this tutorial, you will learn how to make a bootable USB recovery disc for Mac OS X 10.7 or higher, which will allow you to reinstall or repair your Mac operating system.
Step 1: Get yourself a USB flash drive that you are no longer using (At least 1GB recommended).
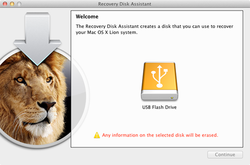
Step 2: Format it using the OS X Disc Utility if it is not already formatted. This will ensure that it will work properly. This step is not completely necessary, but should be done as a precaution. Step 3: Download a copy of OS X Recovery Disk Assistant from Apple's website. You can download it from here. Step 4: Make sure the USB drive you plan on using is plugged into your computer. Step 5: Uncompress OS X Recovery Disk Assistant and run it. Step 6: You should see all the USB drives you have plugged into your computer in the window that comes up. Step 7: Select your USB drive and click on Continue. Note that this will delete everything that is currently on your USB flash drive. Step 8: Wait until the progress bar on the screen is full. This can take some time. Be patient. Step 9: After the progress bar is full, you should be brought to a screen that tells you it is done, labeled Conclusion. You can now press the Quit button. Step 10: To use the recovery drive, make sure it is plugged into your Mac and boot from it. |
|

|
